Sunday, October 2, 2011

Holy Caramel, Batman!

I pulled a little inspiration from a little bit of everywhere for this recipe.
First of all have you had one of these??

Salted Caramel Mocha
It's a Salted Caramel Mocha from Starbucks. If not, go try it!
Second, are you on pinterest? I'm totally addicted, I can't seem to help myself. I sit there and flip through all these gorgeous crafts and recipes, and some I actually try...like today's recipe. Like I've said before I sort of pick and choose from recipes and make it my own. I liked this and this. Let's begin!

First of all, if no one told you (like no one told me) making caramel is a serious thing. This is not something you just do in 15 spare minutes. They are delicious, but they require some work. It's not impossible, just be sure you have the time and patience required...oh and the thermometer. Seriously, you need a good one, temperature's are very important!

Ok, remember the pumkin?? Well that's where we get our Pumpkin Seeds!

Ok you take your Seeds
and boil them
No kidding...stick with me here.
For every 1/2 cup of seeds you need a cup of water. For every cup of water you need 1/2 teaspoon of salt. *Believe me, you'll be glad you did this step.*

Then drain and put in an oiled (tbsp or so of EVOO) pan
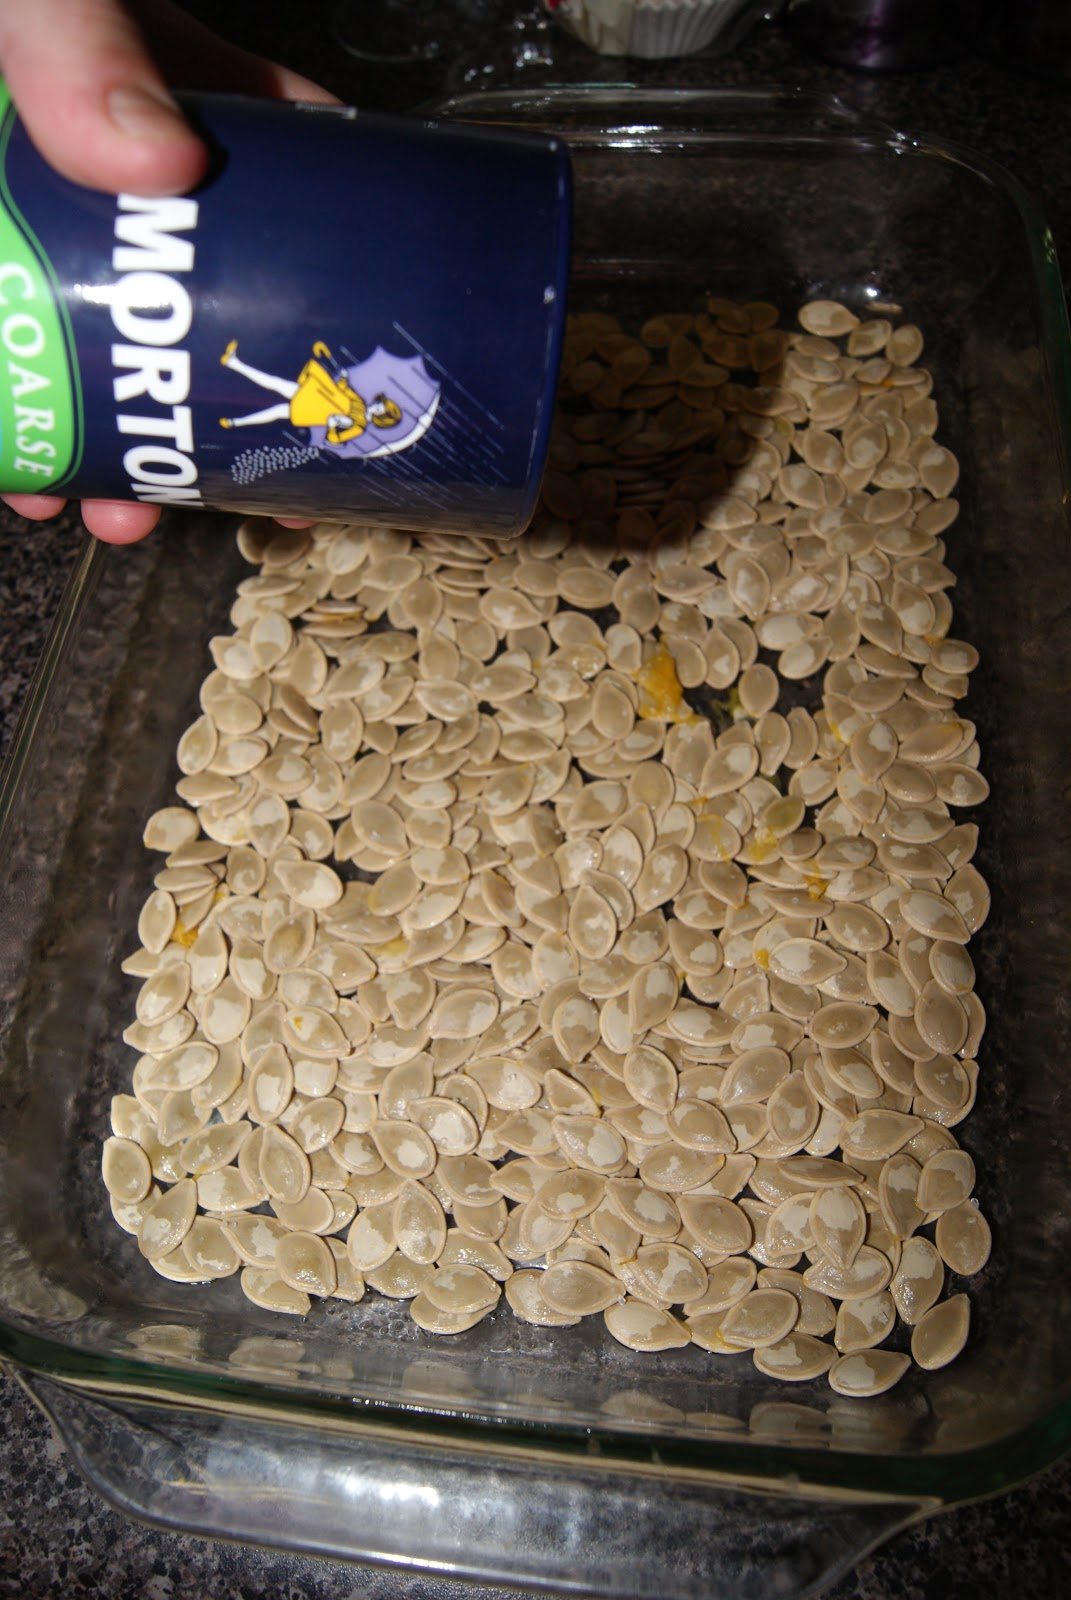
Salt them with some coarse salt. Not too much, just rather lightly.

Bake at 400 for 20 minutes or so. Mine took 25 minutes.

I forget how much I love these.

You may eat as is. In fact, please do.
For this recipe though, crack them to get the deliciousness inside.

Then spread the deliciousness into a pan that had parchment paper. (Oil the parchment). You totally need the parchment, totally need the spray on the parchment.


Now on to the other part!

You'll need one teaspoon of pumpkin pie spice, I just made my own. Here's how:
Measure 1/2 teaspoon of cinnamon into a small bowl or cup.
Add 1/4 teaspoon of ground ginger.
Add 1/8 teaspoon of ground allspice or ground cloves.
Add 1/8 teaspoon of ground nutmeg.
Stir to blend.
Makes 1 teaspoon of pumpkin pie spice.


Here's what else you need:
1 tsp pumpkin pie spice
2/3 cup of pumpkin puree
1 1/2 cups of heavy cream
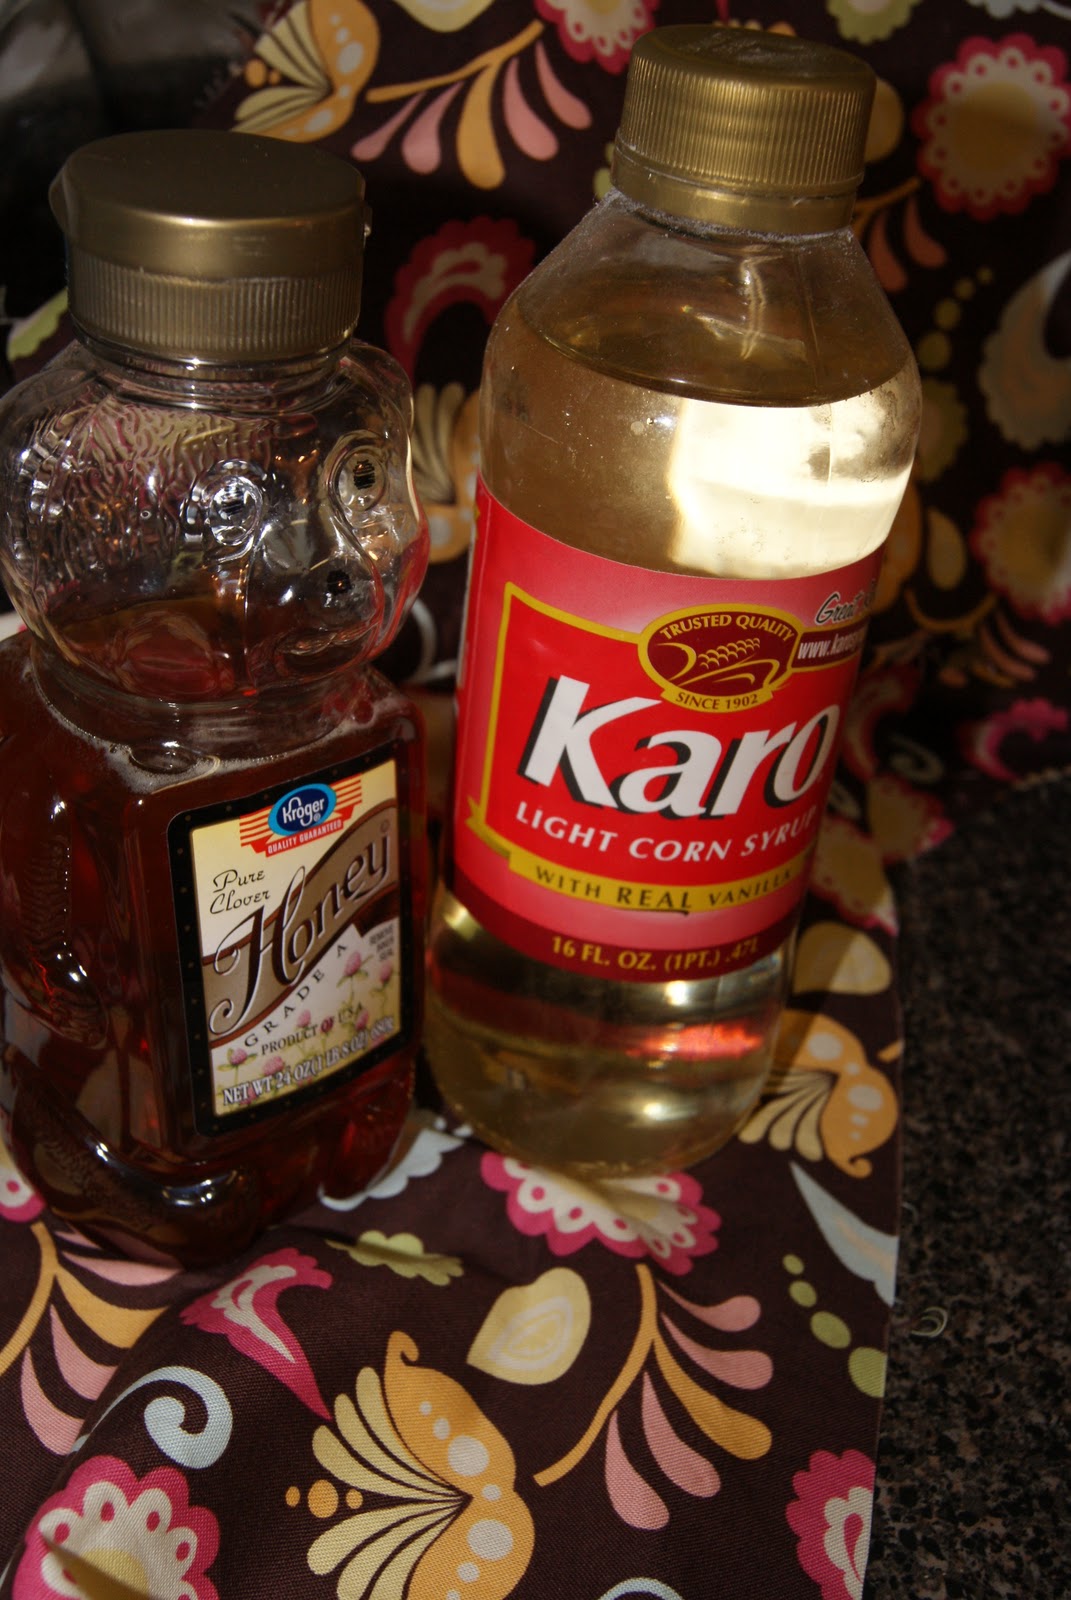
1/2 cup light corn syrup
1/3 cup honey
1/4 cup water
4 tbsp butter, cut into chunks
1 tsp lemon juice
coarse salt

You will also need two pans. One needs to be fairly large because as the syrup cooks it grows and bubbles...it's amazing.

In your smaller pan we have the heavy cream, pumpkin puree and spices.
Heat until scorched. Scorched means that it's hot, but just below the boiling point. It'll need stirring a few times because it will form that skim on the top.

Aren't we looking fall-ish!

In your larger pan heat the syrup, honey and sugar. Let the sugar melt and do all it's caramelly goodness.

Here's where you need your thermometer. You want to get to 244 degrees. After you hit about 220 or so you're going to need to be stirring, constantly. Make sure your pan is at least 4 inches high, I would be more comfortable with 6 inches or so. You do not (believe me!) want this stuff to boil over. It leaves a lovely sticky film on everything!

I had to stir with an oven mitt on because it's crazy how much steam this baby creates and 244 degrees is pretty serious!

Once you get to 244 degrees SLOWLY add your cream and pumpkin mixture.
Now you want to get your temp back up to 244.
This could take a while, it took me at least 30 minutes. It gets back up to the 220's pretty fast, but it's the last bit there that takes so long.

Keep an eye on it, it starts getting thick really fast and you'll want to keep it from sticking to the bottom.

Once you get to 244 degrees, take it off the heat where we'll add out butter and lemon juice.

Stir well to work the butter in evenly.


Here's what we have!


Now, pour (slowly) over your pumpkin seeds.

After it has cool for about 30 minutes or so, sprinkle your coarse salt and press it in (just a little)


Now you'll have to let it set in a cool dry place for at least 2 hours. The longer the better.

Then flip it out of the pan and remove the parchment

Then cut into cute little squares!

The easiest way to keep these is to wrap in parchment.

These were quite delicious. Next time, I would probably half the recipe because that's alot of caramels. But they have this slight pumpkin flavor that add so much to the candy. And who doesn't love pumpkin seeds!


Thursday, September 29, 2011

Pumkin, cousin to the Pumpkin

I've been try to catch up with Rachel over at The Traveling Spoon and got a kick out of her "Pumpkin of Shame". 
Plus look at how beautiful this is:

Man, that mum is looking a little sad.

For all the delicious fall recipes that require pumpkin puree you have to pretty much start the same way, so that's what we're going to start with, getting the pumpkin without the can!


Apparently I got the biggest pumpkin in the world. It's sort of like cutting down a Christmas tree, they always seem small until you get them in the living room.

Anywho, start by cutting the pumpkin in half (the best way you can...)

This is looking a little Halloweenish!

I just love the smell of a pumpkin. It's so mmmm mmmm refreshing!

Scrape out the stringy gooey stuff, but seperate the seeds.


Much better!


I had to go back to my exhausting cake decorating days to find a pan to fit the pumpkin in. Fill with an inch or so of water.
Tehehe, they grow pumkin's in TN...related to, but not to be confused with the Pumpkin

Lay the pumpkin, cut side down, in the pan and bake at 350 for about 45 minutes to an hour. After about 30 minutes test every once in a while with a fork to see how tender it is. When the fork goes in easily, you're ready.

Let them rest for 15 or 20 minutes or so to cool a bit.

Then scoop out the deliciousness!

Put in the blender/food processor and blend until it's puree. This pumpkin made an enormous amount of puree, luckily it freezes well!

Now we'll use this base to go wild and pumpkin crazy!


Wednesday, September 28, 2011

Review: Neely's Bar-B-Que

I heart the Food Network.
I think those Neely's are cute as little buttons!

We ran across their BBQ joint a few weeks ago when we went to StrongBonds. We didn't have time that day, but it made the short list of things to do in Nashville, TN real fast.

So this past weekend when we went meandering through the Music City this past weekend we decided to try it out.

It's real easy to miss. It's just tucked back into a very quiet and unassuming strip mall and is really almost hidden...except for all the cars in the parking lot.


Sorry about the picture quality, I took it on my phone.
I kind of expected something fancy for a couple of Food Network stars, but it was a BBQ joint.
Wood floors, writing on the walls and smoke in the air. It was fantastic, the place that makes you think you're going to get great food.

You step right up to the counter and order. They don't have a huge menu with lots of complicated things. It's just down home bbq-esque food and fixin's.

Research and Development went with the Rib Tips, BBQ Beans and *gasp* BBQ Spaghetti.
He loved them. (which was rather evident when he shoved an entire one in his mouth...). The meat was extra tender, and the sauce is fantastic. The beans were delicious and I am totally intrigued by this BBQ Spaghetti concept.
It was great. It was rather strange to have BBQ sauce and noodles but it's a fantastic idea.

I had a brisket sandwich and fries. I ordered mac and cheese but ended up with fries, I really wish I had said something and got the mac and cheese.
BUT the brisket was amazing. No kidding, it was one of the best things I've ever put in my mouth. I must admit that this is the first time I've had anything Memphis style, and one of the few times I've had brisket. It was a Hallelujah singing moment for me. The meat was so tender and tasty. The sauce was outrageous. Sweet, but not too sweet. Not too tangy and just a teeny bit of heat.

I will soooo be going back.


Tuesday, September 27, 2011

Thinking outside the box

I must be honest with you hear folks...I L.O.V.E. Velvetta Shells and Cheese. I cannot help myself. I just love it. I like to put a little extra salt and just go to town. That is why I rarely buy it. Because I just almost cannot sleep at night knowing that those delicious little shells are in my cabinet just waiting to be scarfed. This is the only side dish/horrible for you food that I consider to be a vegetable. (As in you MUST have one main and two veggies with dinner).
I must confess that I had never before made real live mac and cheese with real live cheese! So, thanks to some inspiration from pinterest.com I finally made the venture with these:

Cheese and Spinach Muffins!!
I modified this recipe.

Here's what you'll need:

1 box of cooked whole wheat pasta
2 cups of shredded cheese (I used a combination of sharp cheddar and colby...I'll use Gruyere next time and maybe Havarti)
1 cup of milk
2 cloves of minced garlic
1 egg white & 1 egg
1 lb bag of frozen spinach thawed and drained
1 tbsp of flour
1tbsp of butter (Apparently I forgot to include the butter and flour and the spinach in the picture)


*Preheat oven to 400 degrees.
Melt your butter in a saucepan.

Add your tbsp of flour to your melted butter to make a roux:

Here we have the Roux...this is in fact my very first roux ever, it was fun...you should try it!
Next add your butter and minced garlic. Allow mixture to heat until just before the boiling point

Slowly stir in your cheese.

Your mixture will start to thicken nicely until it looks like:

At this point you will slowly whisk in your egg and egg white. SLOWLY. This did not work out very well for me as I didn't SLOWLY enough. BUT, the eggs act as a binding agent. If you aren't going to bake these in the muffin tin, I'd leave them out.

Add cheese mixture to spinach *Side note, I happen to LOVE spinach. I added a whole pound of the good leafy green stuff. If you are not a fan you might want to ease off*

Add noodles. (I didn't have any elbows so I went with the rotini's)

Isn't it beautiful. I love things that have bright colors and the cheese with that spinach is great!

If you're going to make the muffin cups then spray your pan and ice cream scoop it in.

If you are making the muffins, you will need to wait a few before digging in to let everything cool and settle. I however, did no such thing! Pairs nicely with an "everything in the fridge" quesadilla.

This mac and cheese is delicious. The spinach was so great in it. I didn't feel the need to over salt this because it had so much flavor. The cheese that I picked did just.ok. Next time I'll pick a gooier variety. I happen to like Havarti and Gruyere. I think that the pasta turned out to be a great choice (just by accident). I don't think the elbow's would have been able to withstand a whole pound of spinach. The rotini also did an excellent job of holding onto the cheese sauce.
Overall, this recipe will be going into the keeper stack! I'm pretty excited about my very first roux and home-made mac and cheese in the same recipe!