Showing posts with label Sides. Show all posts

Thursday, January 26, 2012

It was about time

for me to get a cold, so I have one...uggg.

This whole week has been a bit of a blur of congested ugginess. I've been so slack and I apologize!

This past weekend I did some serious cooking. It had been a while and I needed it. Maybe I'll feel more like it this weekend too.

I heart Pinterest. I hope you are on it because it's fantastic. If you are, find me!! I'm asb0521.

So I found this recipe on Pinterest and it's definately added to the plus pile. We're making Vegetable Tian!

Here's what you need:

1 yellow onion, sliced or chopped
2 cloves of garlic, minced
2 potatoes of your choice
1-2 zuchinni
1 yellow squash
3 tomatoes
1/2 cup grated cheese of choice
2 tbsp EVOO
Thyme
S&P to taste

Preheat to 375


Saute your onions with your EVOO until they are translucent then toss in your garlic and cook together for about 2 minutes.

So in your casserole dish put a layer of your onions. I choose a smaller dish and I should have put a bit less onions.

Slice all your veggies so that they are all about the same size.

Layer them all pretty like around the dish. I love love love the way this looks!

I did about 3 sprigs of Thyme, It's up to you really!

Drizzle about a tbsp or so of EVOO then top with your thyme and S&P to taste, then cover and cook for 35 minutes.

I added a few bread crumbs, optional little crunch. Sprinkle on the cheese, I picked Mozz.
Leave uncovered and put back in the oven for about 25 minutes.

It looks so great that the hubs couldn't keep his fingers off it!

I served Pot Stickers with it from over at The Traveling Spoon.
It was fantastic! All the flavors melted all together so great. The potatoes were my favorite!
The hubs loved this and it warms up really great. The thing I like most about this recipe is that you can really taste all the deliciousness that the veggies have to offer. Just going with a light seasoning makes all the flavors just do their thing.
This is so easy that it's silly but it tastes so great!

Thursday, November 17, 2011

You need this in your life!

Oh boy! I cannot wait for you to read and try this. God Bless Pinterest!

I had a Butternut Squash that I had to do something with and pinterest was up to the job!

So here's what we're going to make (We as in you too!) You need it, no kidding!

Roasted Butternut Squash Ravioli with Sage Brown Butter Sauce!
This sounds fancy schmancy, but it is so easy! If you take this to an event you will be hailed a hero and master chef (that's what I'm going for anyway).

Here's what you need:
1 butternut squash
olive oil
1/2 cup parmesean
1/2 tsp nutmeg
pasta dough (don't freak out, it's easy and the recipe is below, seriously stick with me here)
2 tbsp ground sage (or about 12 sage leaves)
1 stick of butter (channel Paula)

OK, let's get started!
PreHeat to 425 degrees!

This is the hardest part folks. Take your peeler and peel the squash.

Cut in half and scoop out the stuffin's!

Cube the squash, try to keep with a consistant size. Drizzle with EVOO and a little S&P. Another requirement is to rock out on your pink iPhone to Pandora!

Cook for 25 minutes!

Oh, what a great color!

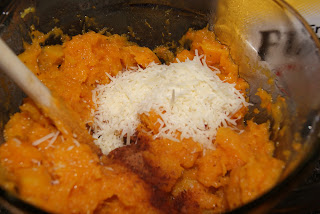
Add the nutmeg, parmesean and S&P. The Squash is tender enough that just stirring will make the squash the consistency of mashed potatoes.

Your filling is ready!

Now to the pasta dough, here's what you need:

2 cups flour
3 eggs

That's it, for real!

Flour

I added the eggs one at a time. You will have to mix and using a spoon push the flour into the mixture. Mix until the dough has formed a ball:

Amazingly quick and easy!

I don't have a pasta roller (yet) so I just rolled out the dough. Get it as think as you can without having holes in the dough.

With a biscuit cutter cut a cute little circle. Add a little squash and brush with a little water on the edge of the circle.


Pinch around the edge to secure. I started with these half circles but changed to having a piece of dough, squash and a piece of dough on top. I liked those better. Still the same concept.

In the mean time, in a pan add your sage and stick of butter and melt. You want the butter to turn to a beautiful shade of brown.


Now that you have your ravioli, drop into boiling water. Be sure your water is salted. It only takes between 2 and 3 minutes for the ravioli to be done. When the ravioli pops to the surface, it's done.

From the pot, but your ravioli into the pan with the brown butter sage sauce.

That's IT! It's really easier than you think! AND SOOOOO delicious!

You could easily use this as an entree and be fully satisfied. We made it a side item!

It was just as good as it looks.
I am so excited about making my own ravioli.

Here's what you do to freeze it. Make the pasta, don't cook it!
Lightly flour the biggest sized cookie sheet that will fit in your freezer and line up your ravioli on the cookie sheet. Once the pasta is frozen you can stack them in a freezer safe bowl and they won't stick together. Just take them out of the freezer, put them in boiling water for about 3 - 5 minutes. What a great, easy, quick dinner for those nights where you're in a hurry!

Try it, tell me how it was!


Tuesday, October 11, 2011

The little things

Today, over at the other blog I shared one of the little things abour Army wife life that I love.

Another one is that I can cook whenever I want. If I want to drag out all my pots and pans for a lunch, I just do it! I don't have to wait until dinner time to get all cookish and have fun! I love that!

Today I had a great side for lunch that I'll be adding to the make again stack.

I adapted this recipe from Real Simple.

Here's what you need for your Three Bean Salad:
3 cans of assorted beans (I used Kidney, Black and Garbanzo)
2 small celery stalks finely chopped
1/4 finely chopped onion
1 cup of finely chopped herbs (really whatever you like I used half cilantro and half parsley)
3 tbsp lemon juice
1/4 (or less) EVOO


I love beans, I always have plenty in the pantry. I try very hard to have the reduced sodium versions.
Be sure and rinse the beans really well. You don't want all the gunk in the bottom of the can.

Oh how lovely! I love all beans, but garbanzo beans are my favorite!

Chop all your veggies and herbs pretty small, it makes for a well rounded easy bite!

Here we have our chopped veggies and beans!

Add in your herbs and drizzle in your EVOO and add your lemon juice.
I love to add lemon juice to things where you would normally add an italian dressing or even heavy mayo (like pasta salad or tuna salad) it adds such a great flavor and give you a totally different feel to the recipe.

Oh boy! This is so good. That lemon juice totally makes it, not to mention the cilantro!
I paired this with a fantastic Roast Beef sandwich for lunch.
It would also be great if you added some corn!
I can eat this all week, it has plenty of protein, iron and tons of flavor!
AND, it's so easy, you don't even need to turn on the stove. It's a one pot wonder!


Tuesday, September 27, 2011

Thinking outside the box

I must be honest with you hear folks...I L.O.V.E. Velvetta Shells and Cheese. I cannot help myself. I just love it. I like to put a little extra salt and just go to town. That is why I rarely buy it. Because I just almost cannot sleep at night knowing that those delicious little shells are in my cabinet just waiting to be scarfed. This is the only side dish/horrible for you food that I consider to be a vegetable. (As in you MUST have one main and two veggies with dinner).
I must confess that I had never before made real live mac and cheese with real live cheese! So, thanks to some inspiration from pinterest.com I finally made the venture with these:

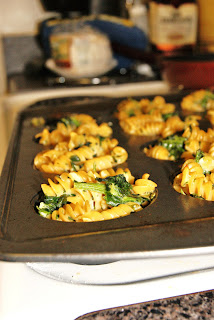
Cheese and Spinach Muffins!!
I modified this recipe.

Here's what you'll need:

1 box of cooked whole wheat pasta
2 cups of shredded cheese (I used a combination of sharp cheddar and colby...I'll use Gruyere next time and maybe Havarti)
1 cup of milk
2 cloves of minced garlic
1 egg white & 1 egg
1 lb bag of frozen spinach thawed and drained
1 tbsp of flour
1tbsp of butter (Apparently I forgot to include the butter and flour and the spinach in the picture)


*Preheat oven to 400 degrees.
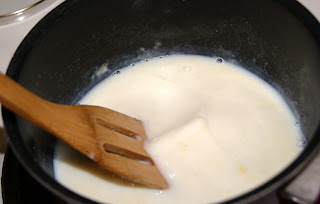
Melt your butter in a saucepan.

Add your tbsp of flour to your melted butter to make a roux:

Here we have the Roux...this is in fact my very first roux ever, it was fun...you should try it!
Next add your butter and minced garlic. Allow mixture to heat until just before the boiling point

Slowly stir in your cheese.

Your mixture will start to thicken nicely until it looks like:

At this point you will slowly whisk in your egg and egg white. SLOWLY. This did not work out very well for me as I didn't SLOWLY enough. BUT, the eggs act as a binding agent. If you aren't going to bake these in the muffin tin, I'd leave them out.

Add cheese mixture to spinach *Side note, I happen to LOVE spinach. I added a whole pound of the good leafy green stuff. If you are not a fan you might want to ease off*

Add noodles. (I didn't have any elbows so I went with the rotini's)

Isn't it beautiful. I love things that have bright colors and the cheese with that spinach is great!

If you're going to make the muffin cups then spray your pan and ice cream scoop it in.

If you are making the muffins, you will need to wait a few before digging in to let everything cool and settle. I however, did no such thing! Pairs nicely with an "everything in the fridge" quesadilla.

This mac and cheese is delicious. The spinach was so great in it. I didn't feel the need to over salt this because it had so much flavor. The cheese that I picked did just.ok. Next time I'll pick a gooier variety. I happen to like Havarti and Gruyere. I think that the pasta turned out to be a great choice (just by accident). I don't think the elbow's would have been able to withstand a whole pound of spinach. The rotini also did an excellent job of holding onto the cheese sauce.
Overall, this recipe will be going into the keeper stack! I'm pretty excited about my very first roux and home-made mac and cheese in the same recipe!


Friday, September 2, 2011

Found them late in life

Do you have a thing that you just LOVE that you found late in life??

My late life find is beets.
Funny story:
When Research and Development was going to take his physical at MEPS he was worried about his BP. He read somewhere that beet juice was really good for lowering BP. SO off I go on a search for beets. He says he needs 3 pounds to make the beet juice (oh boy).
I get the 3 pounds of beets home and he reads that it's possible to go blind from beet juice! So now I have 3 pounds of beets to do something with...uggg.

Turns out I love beets!

Here's my favorite:
Roasted Beets
Beets
Olive Oil
S&P

Cut the tops off (save them!) Someone asked me about does the beet bleed all it's color out? I have no idea, this is just how I do it.

Leave the skin on. In a dish put enough olive oil to cover the beets then dust with S&P. Cover

Look at this beautiful dish. Don't you love it? The Mama-in-law gave it to me for Christmas one year!
Cook on 350 for at least 45 minutes. You can leave it longer, but for sure at least that long.

Look at that beautiful color!
Now remember we left the skin on. Now that it's cooked all you have to do is lightly rake a fork down the side and the skin slides right off.

With the greens that you saved off the tops of the beets. Wash, tear into bite sized pieces and wilt down (like spinach) with Olive Oil and S&P. Soooo delicious. More flavorful than spinach. You have your two beautiful colored veggies from the same plant!